qemu
RT-Thread Studio QEMU Simulator Introduction
Embedded software development depends on development boards, which can be simulated using virtual machines such as QEMU without a physical development board. QEMU is a virtual machine that supports cross-platform virtualization and can virtual many development boards. To facilitate the development of embedded applications without a development board, RT-Thread Studio provides a QEMU emulation debugger. This article focuses on emulation using the RT-Thread Studio QEMU emulator on the Windows platform.
Create Project
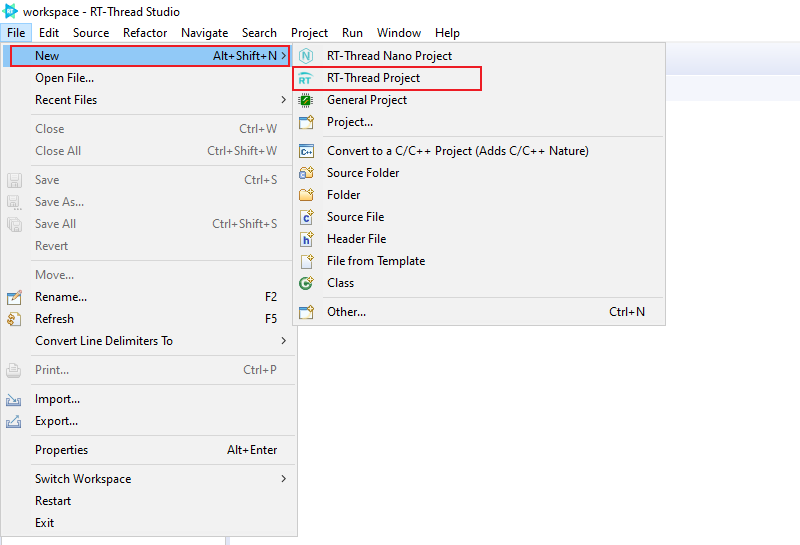
- Click File button and create RT-Thread project:
- Project configuration, as shown in the figure below, select QEMU in the Adapter configuration TAB and configure the appropriate emulator:
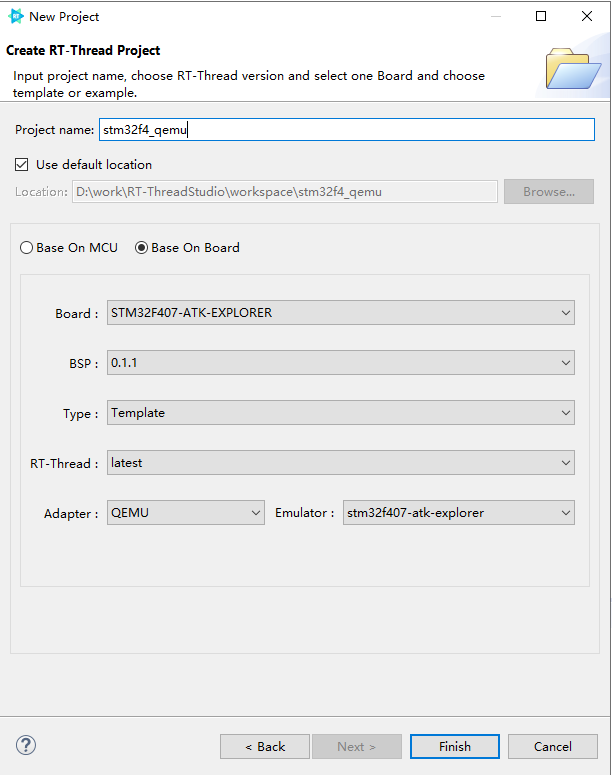
- Click the Finish button, and a new QEMU project will be created in the workspace.
Switch Debugger to QEMU
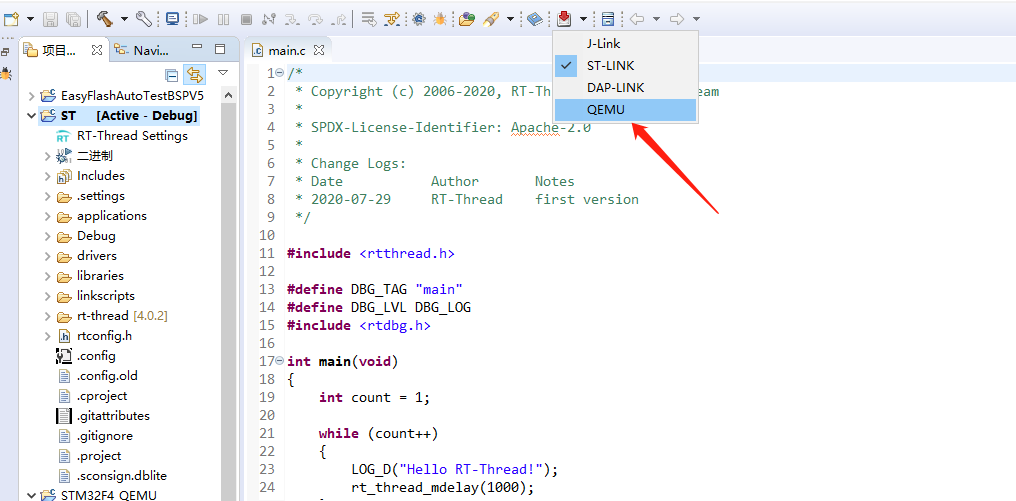
If the current project is an old project or the debugger you are currently selecting is a debugger other than QEMU and you want to use QEMU, click the drop-down box to the right of the Download button and select QEMU:
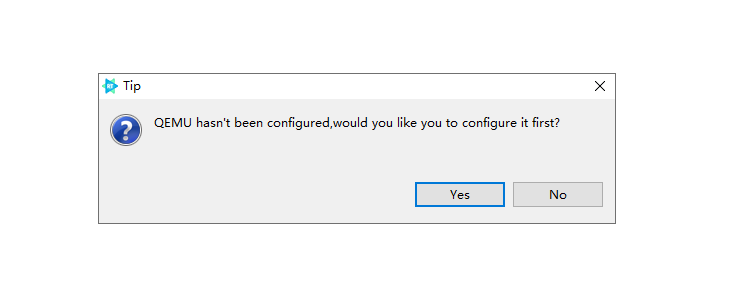
If the current project has not configured QEMU, after selecting QEMU, the prompt of QEMU Hasn’t been Configured will pop up, click Yes to display the QEMU configuration interface, the detail configurations will be described in the next section.
QEMU Configuration
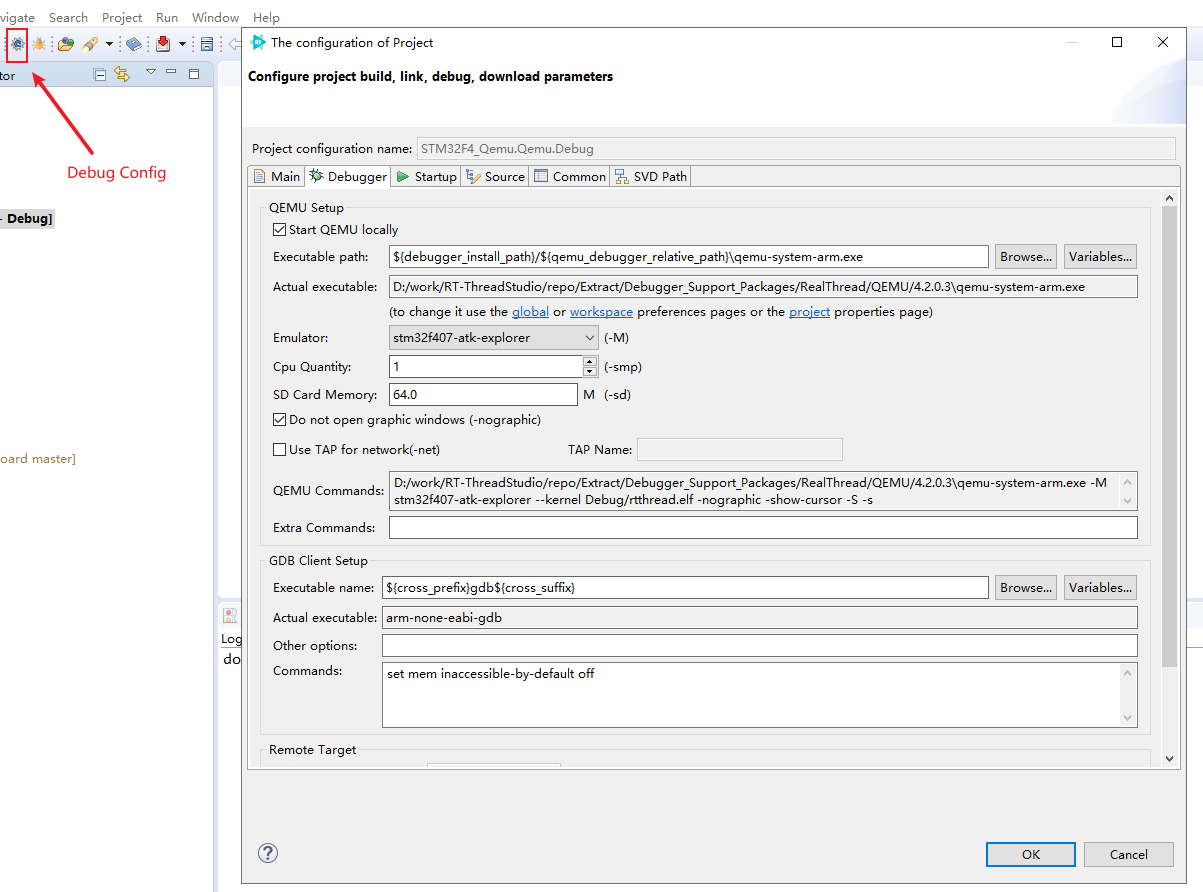
Click Open Debugging Configuration to jump to the QEMU configuration interface, and the parameters can be configured as follows:
| Parameter | command |
|---|---|
| Emulator | -M |
| Cpu Quantity | -smp |
| SD Card Memory | -sd |
| Don’t open grapgic windows | -nographic |
| Use TAP for network | -net |
| Extra Commands | None |
After filling in the form, click OK button to save configuration. The default configuration is as follows:
Simulation Debugging
Under normal compilation conditions, the IDE will automatically start QEMU and open the serial port by clicking the mode button, and enter breakpoint debugging mode, where you can observe the output of each breakpoint step by step, or execute your own commands in the serial port.

QEMU Serial Debugging
RT-Thread supports FinSH module, and users can use command operations in command line mode. You can view all supported commands by typing ‘help’ at the debugging terminal or by pressing the TAB key. As shown in the figure below, the left is the command, and the right is the command description. The previous step showed you how to start QEMU, and this step shows you how to debug QEMU user programs in a serial port.

View The Current Thread
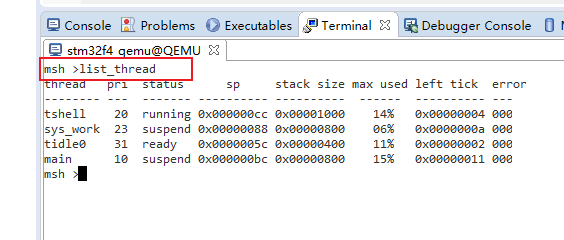
To view the current thread and information such as thread state and stack size, please enter the command list_thread :
Check The Timer Status
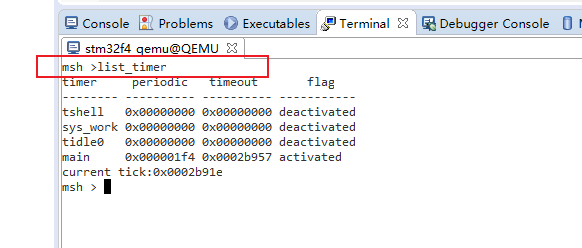
Enter the command list_timer to view the status of the timer :
Add User Commands
- Users can use
MSH_CMD_EXPORTto export the command to MSH:
1 | |
- After compilation, you can enter the custom command
hello_sampleat the terminal:

QEMU Network Communication
While the basics of QEMU are described above, here’s how to use the complex peripherals on QEMU. RT-Thread Studio QEMU supports network communication and enables QEMU to connect to the network by enabling LWIP.
Basic Function
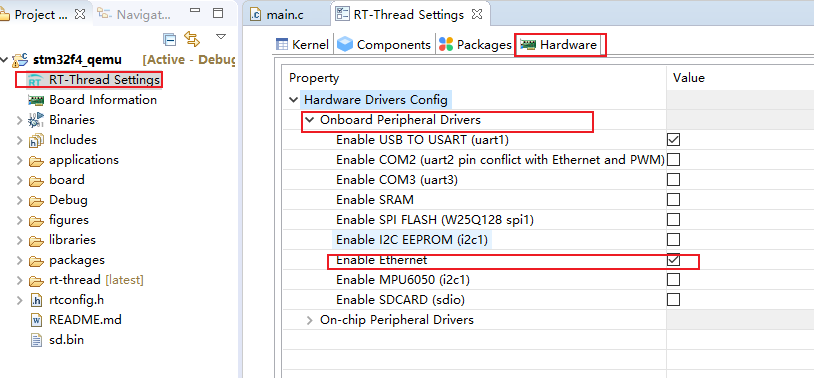
- Enable ETH; Click RT-Thread Settings, select Hardware, and select Enable Ethernet function:
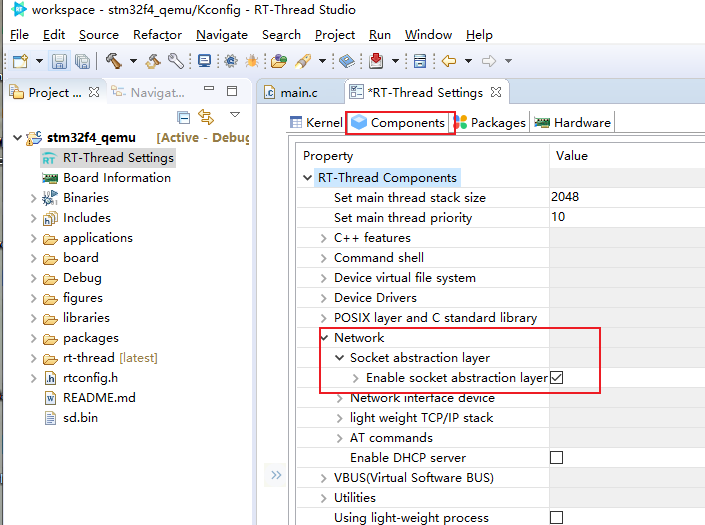
- Enable SAL; Select Components and Enable Socket Abstraction Layer:
- Save Configuration; You can use the combined command Ctrl+Shift+S, or the following button to save the configuration:

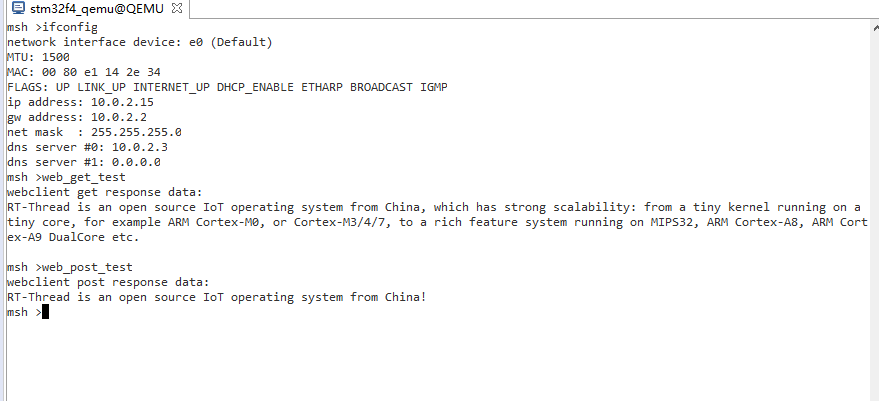
- Debugging; Click the compile button, and start debugging after the compilation is completed; Enter the
ifconfigcommand in the terminal to query the IP address obtained by QEMU:

Advanced Function
This section introduces the advanced function about ethernet of QEMU.
IoT Packages
Thanks to RT-Thread’s rich software package, Studio users can quickly develop the application layer instead of focusing on the underlying adaptation. Below is an example of using a package on QEMU.
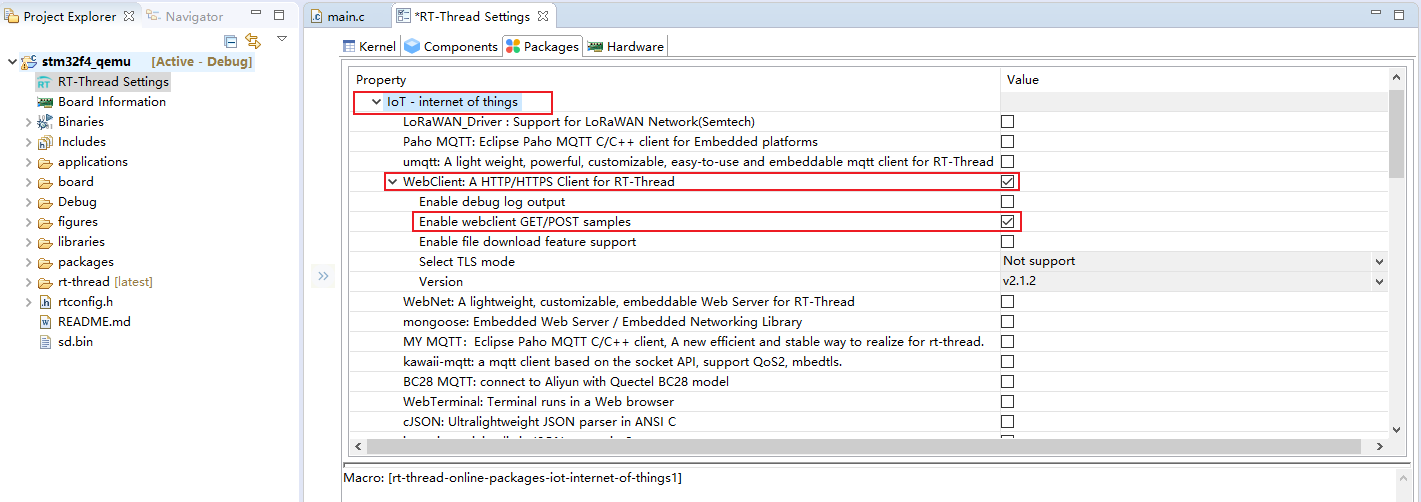
- Open RT-Thread Setting and open WebClient software package to enable WebClient GET/POST samples:
Save configuration;
Compile and start debugging;Terminal input command
web_get_test,web_post_testto test QEMU network functionality:
Enable TAP
The default QEMU configuration cannot use the ping command; Once TAP is on, QEMU can use the ping command.
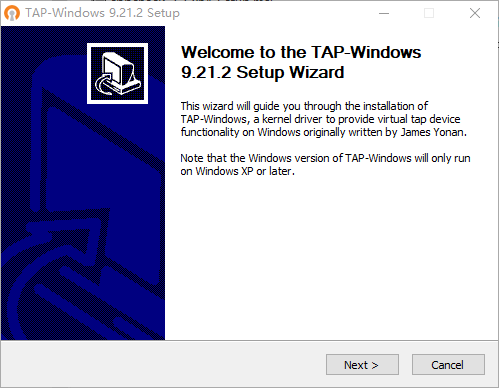
- Install the TAP network card by default all the way:
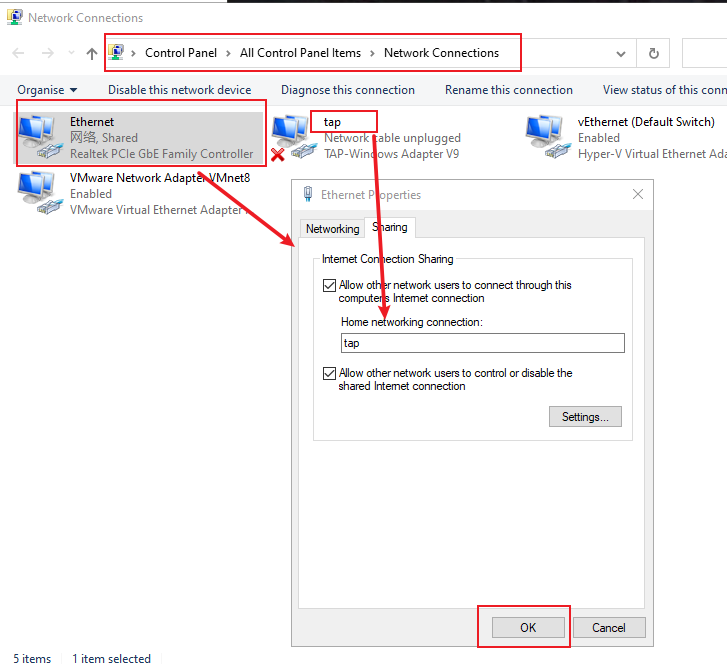
- Configure TAP network card; Open the Network Connections to change the adapter settings and rename the installed virtual network card to tap, as shown below:

- Right click on the current network connection that can access the Internet (Ethernet is used in this paper), open the attribute -> share, select the home network connection as tap, and click ok to complete the setting, as shown in the figure below : (if there is only one network card, there is no need to pull down to select the network card, as long as the box is checked to allow sharing)
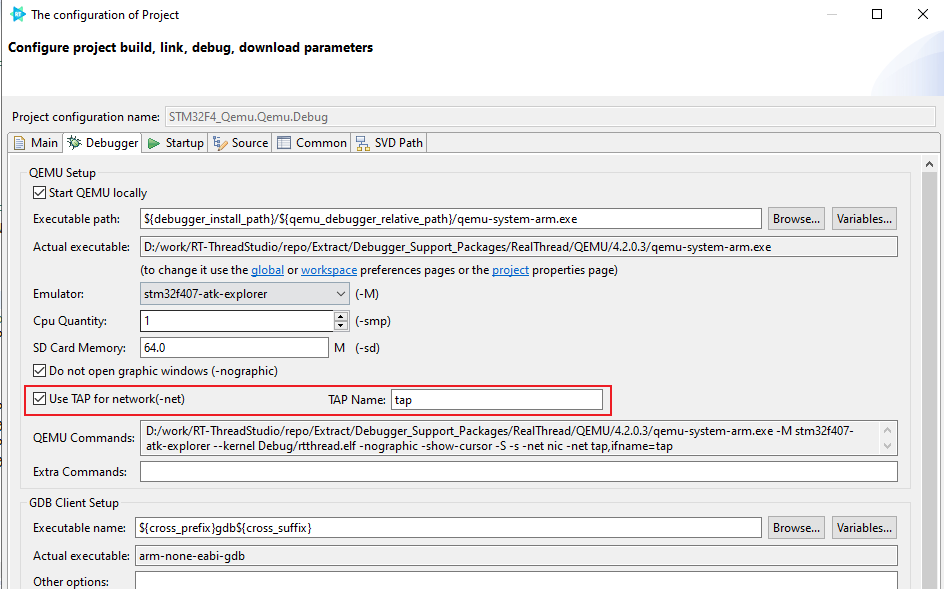
- Configure QEMU; Add TAP configuration and save configuration:
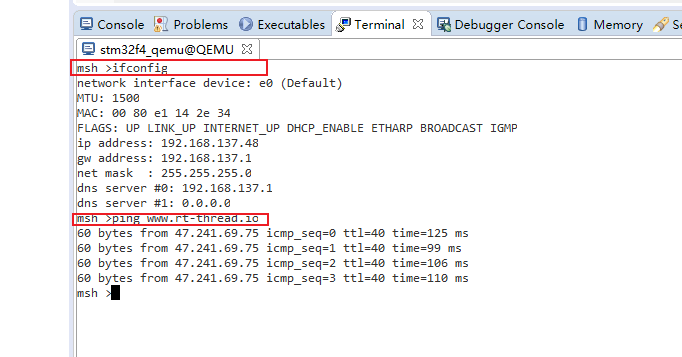
- Compile, start debugging, and ping test. Enter the command
ping www.rt-thread.io:
In The End
If you have any questions about Studio, please post them on the forum and Studio developers will be more than happy to answer them.